Black Bean Salsa (A Classic)

It’s officially the month of November. While some people are putting away their Halloween decorations and beginning preparations for Thanksgiving, us Southerners are preparing for a different kind of holiday. College Football is in full swing with just 4 weeks remaining in the regular season. But these aren’t just normal football games. These are the games that decide the destiny for each SEC team. We have our rivalries in the Iron Bowl and the Egg Bowl. Don’t forget that battle between the hedges when Auburn goes to take on Georgia or the battle in the trenches when LSU hopes to knock off the Crimson Tide in Death Valley. The month of November is like Christmas to a lot of us Southerners…well, at least for those of us who love our College Football.

Processed with VSCOcam with f2 presetFor those people who don’t actually enjoy watching the sport, there are the tailgating games and, perhaps most important of all, the tailgating food. There are wings, BBQ, dips and spreads. Never is there a shortage of food when your favorite team takes the field. I’m particular fond of dips for game days because they are the perfect food for grazing throughout the day. Just grab a chip every time you walk past the table and you’ll have eaten plenty by the end of the evening. My favorite dish to make for a tailgate is black bean salsa. It’s refreshing and bright. Also, the saltiness of the tortilla chips pairs perfectly well with an ice cold beer, which is a must have every Saturday.

So roll up your sleeves and get out those utensils, it’s time for you to learn how to make this tailgate classic! Let’s get started…

Processed with VSCOcam with f2 presetTHE INGREDIENTS. Now, salsa is defined as a sauce made from chopped, uncooked vegetables and fruits. They are most commonly used as condiments or for dips. Because salsa is uncooked, the freshest ingredients need to be used.

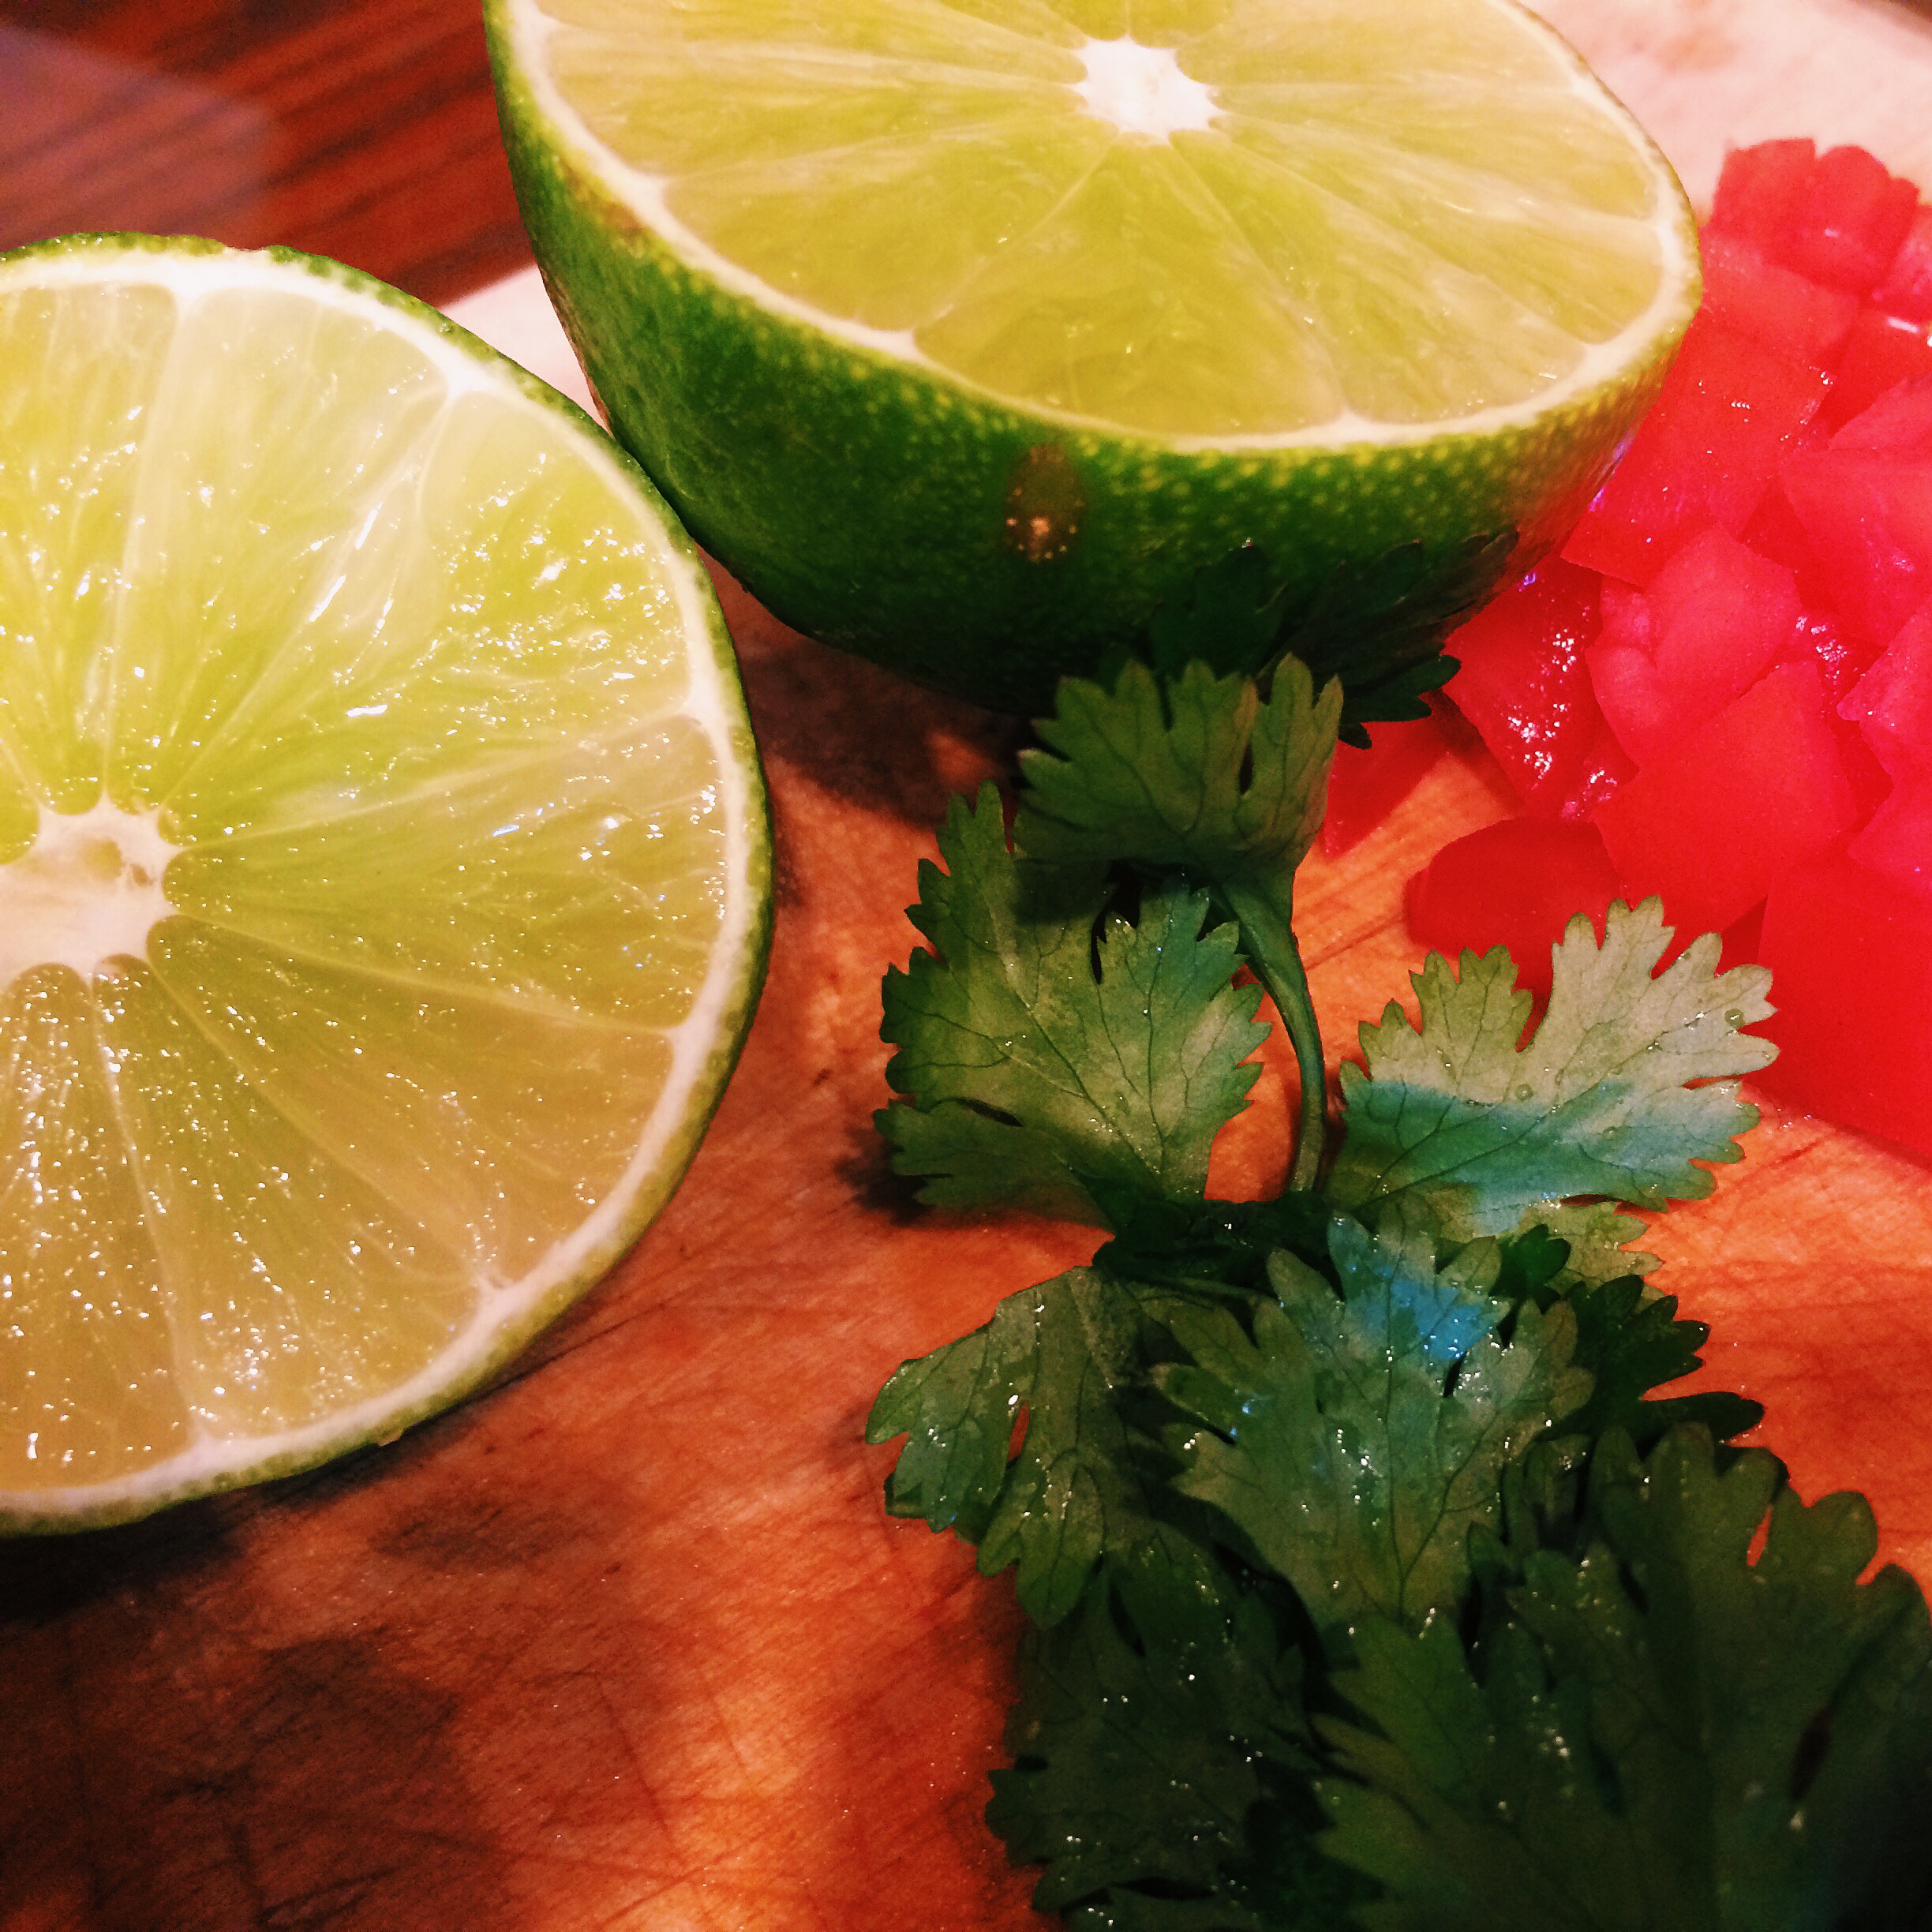
  • 7 Roma Tomatoes, de-seeded, diced*
  • 1 Red Onion, quarter-inch dice
  • 2 cans of Corn, preferably White, drained and rinsed**
  • 2 cans of Black Beans, drained and rinsed (I suppose you could use dried, but I don’t know who would want to do that).
  • 2 Poblano Peppers, roasted, peeled, de-seeded, and finely diced
  • 2 tablespoons Cilantro
  • Lime juice
  • Cumin, ground
  • Salt and Pepper

Processed with VSCOcam with c1 presetTHE METHOD. This is a super easy dish to put together. You simply prepare and dice all of the ingredients and place in a large bowl.

For the poblano peppers, we need to roast them in order to get a nice charred flavor as well as to remove the waxy skin. Usually, I would have done this on the grill, but our gas line was being worked on so I turned to the broiler. Just turn it to high, rub the peppers with a little bit of oil (not too much or you will have a kitchen full of smoke), and place them on a pan covered with aluminum foil (just to prevent the pan from being ruined). Roast them until they are nicely charred on all sides. Place them in a bowl and cover with plastic wrap. This will create steam as the peppers cool off and will make peeling the skin off easier.

Once cooled, peel the skin off and finely chop the peppers. Place them in a large bowl.

For the tomatoes, quarter them, remove the seeds and do a quarter-inch dice. Place in a bowl with your onion, corn, and black beans. Give it a nice stir.

Processed with VSCOcam with c1 presetNow is the time that we add the flavors and really create the salsa. Sprinkle with quite a bit of salt (to taste). The salt is going bring out all of the flavors in the vegetables. Don’t be afraid to be a little overzealous with the salt because these ingredients can take it. You don’t want a bland salsa, do you? But don’t go too cray cray at the beginning. Add it a little bit at a time while tasting as you go. You can’t take any of the salt out, but you can always add more. I’ve always found that if a dish just doesn’t taste right, a little sprinkle of salt brings it all together.

Add your ground cumin. I went with a 1/2 teaspoon, but it’s really up to you. It’s a pungent spice, so add it a little at a time until you have it where you want it. Cooking is always about your taste buds.

Cut a lime in half and squeeze all of the juice out into the bowl. Citrus has a way of brightening the foods it touches. It also acts similarly to salt, in that it brings out the natural flavors of the ingredients. If you don’t want to add more salt to something, try adding a little bit of acid. It might just bring everything together.

Processed with VSCOcam with f2 presetNow, add your chopped cilantro and give everything a good mix. Fresh cilantro is the only way to go here. Herbs add brightness and freshness to foods.

Tasting is imperative for a good salsa. So taste all throughout the process. If it needs more salt, add it. Lime juice? Add it. Cumin? You guessed it…add it.

You might be thinking that this seems like a really dry salsa…and you’d be right. At the current moment, it is rather dry. The magic happens when you let the salsa sit and allow all the ingredients to mellow. The salt and the lime juice draw some of the moisture out of the vegetables, which creates the liquid portion. Because of this, it is best to make the salsa the day before you plan to serve it. After all, most dishes are better the next day, right?

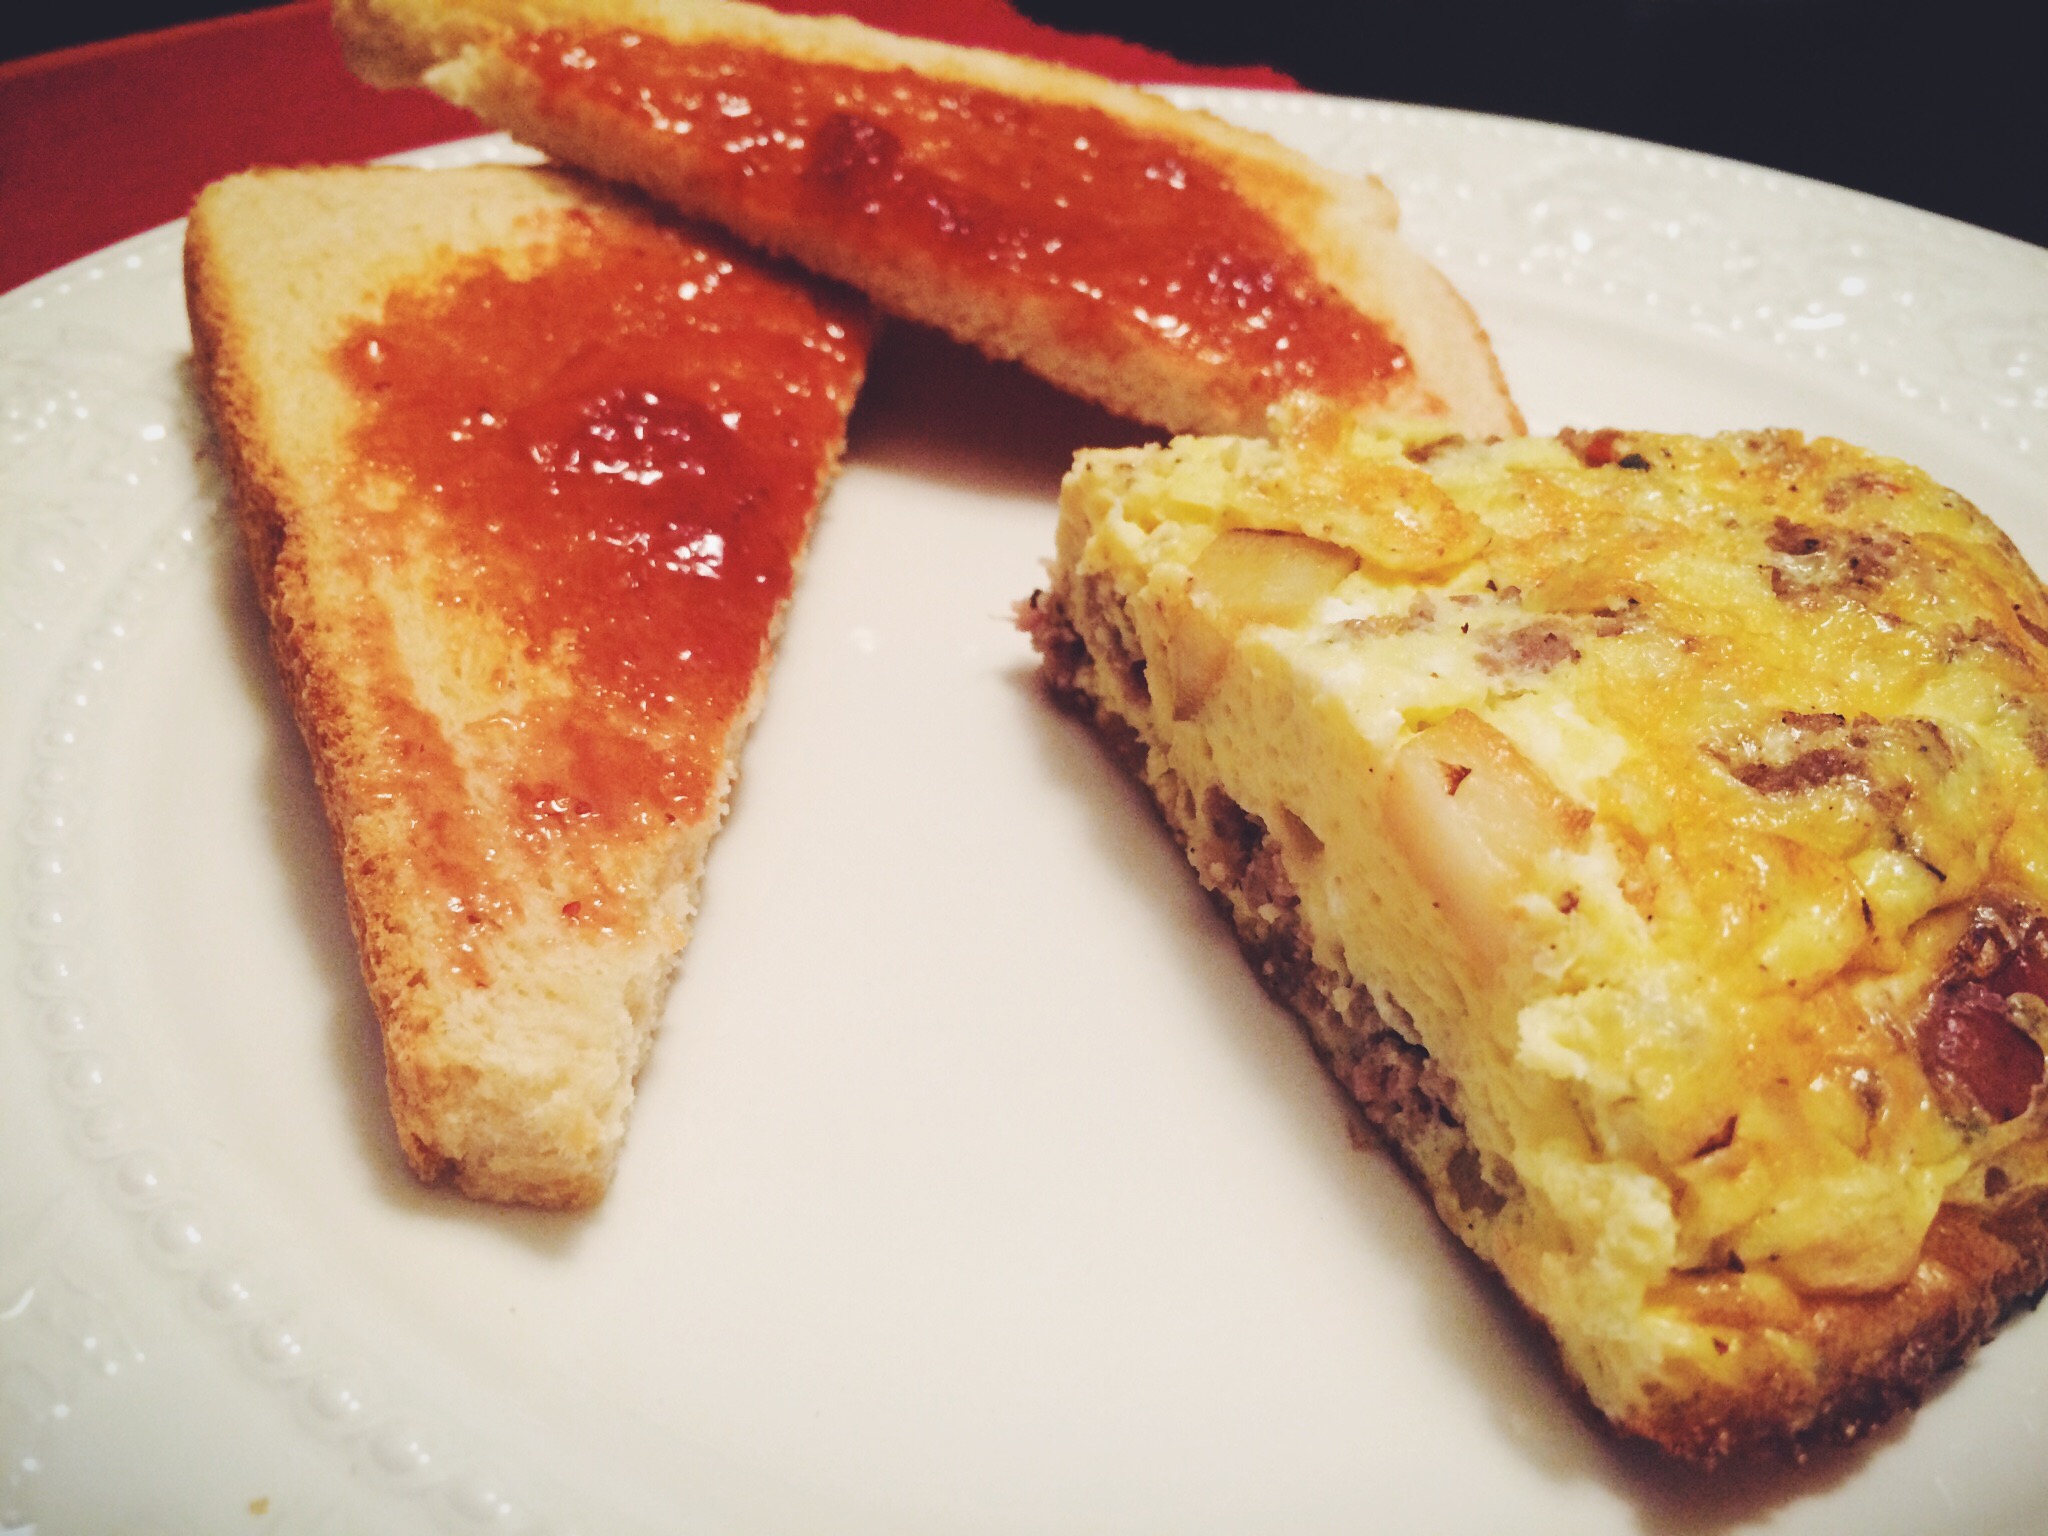
ENJOY IT. Serve up the salsa at your next tailgate. Perhaps do a shot of it every time your favorite team scores. A nice shot of Evan Williams Apple Orchard doesn’t hurt either. Basically, just take a shot of something. It is the holiday season after all.


* I know, I know. It’s November and tomatoes are a Summer vegetable (fruit). I am very aware of this fact, but you’re just going to have to do your best to find a good tomato because canned simply will not do for this salsa. 

** Okay, so canned is perfectly fine for the corn, but not the tomatoes. Who wants to shuck corn and cut it off the cobb? No one. Ain’t no one got time for that. So just be a hypocrite like me and use fresh tomatoes and canned corn. 


Advertisement

Sausage and Potato Frittata

You ever have one of those weeks where you realize you haven’t gone to the grocery store in awhile and the food supply is dwindling? In addition to that, you also don’t feel like actually going to the grocery store because it’s just a hassle and you’re nearing the end of the week? It’s like you have food, but at the same time you don’t. You have little bits and pieces of dishes, but not enough ingredients to fully pull something together.

IMG_2582

We’re at Dollywood. Yup, you heard me correctly.

As much as I hate to admit it, I am in this position a lot. I hate going to the grocery store. But this week I actually have a really good excuse for not having any food in the refrigerator. You see, we went out of town last week and I got back Sunday afternoon, which is our usual grocery shopping day. No one wants to go run errands after they just got back into town. No one. And if you do, you’re just weird. We like to relax. Maybe watch a football game or two. That’s it. No shopping. None.

Unfortunately, it lead to a predicament. We’ve eaten out two nights in a row and it’s really time that we made dinner at home…

“Oh! I can make…no, I ran out of garlic last week…”

“But, what about…nope, don’t have milk.”

“Ugh.”

Processed with VSCOcam with f2 presetI’m pretty sure I stared at the inside of my refrigerator for 15 minutes hoping that it would just tell me what to make. To my disappointment, refrigerators don’t speak. BUT, it all of the sudden came to me. I could make a frittata, a flat, Italian-style omelette. Sausage? Check due to a 1/2 pound that I froze last week (go me!). Potatoes? Check…what else are you going to use two red potatoes for? Cheese? That’s always a check. Eggs? Check and mate. The frittata is on like donkey kong.

*THE INGREDIENTS. You can really just throw anything into a frittata and call it a day, which is why it’s the perfect dish for one of those days where the pantry is telling you that you desperately need a grocery store run. Luckily, you can tell the pantry to pipe down until tomorrow because of the omelette.

  • 7 Eggs, beaten (this is what I used, but you can use as many as you’d like)
  • Half and Half
  • Sausage, ground
  • Onion, chopped
  • Potatoes, cubed and par cooked**
  • Parmesan
  • Salt and Pepper
  • Olive Oil

Processed with VSCOcam with f2 presetTHE METHOD. This particular style of omelette doesn’t require the same technique as the traditional style, which is good for us. Surprisingly enough, eggs are one of the hardest ingredients to master.

The frittata breaks down into two phases: cooking the ingredients that go inside the omelette and then cooking the actual omelette. So, this will be a piece of cake.

Turn the broiler on and place the top rack about 8 inches from the top.

In a hot pan, add some olive oil and brown up your sausage. Drain and set aside.

In the same hot pan, add some more olive oil and brown up the par-cooked potatoes. Season them up with salt and pepper. Maybe some paprika. Make those babies taste good. Remove from the pan and set aside.

Add some more oil and add your onions. Cook until translucent and remove.

Processed with VSCOcam with f2 presetCrack your eggs in a bowl, add a splash of cream, and half of your parmesan cheese. Season well with salt and pepper. This is the only time you’ll get to season your eggs. Whisk it up. Set aside.

Place a pan that can withstand being placed in an oven over medium heat. Disperse your sausage and potatoes around the bottom of the ban. Give the eggs a quick stir and add them to the pan. Stir a little bit to allow the eggs to seep under the ingredients. Let the bottom cook and set. About three minutes. Sprinkle the top with the remaining parmesan. Place under the broiler to allow the eggs to finish cooking the top to get a light brown color. (Caution: Broilers are hot. This dish will cook much faster than you think so I would advise that you don’t leave the kitchen). Move to a wooden cutting board and serve it up.

Processed with VSCOcam with f2 preset

Okay…so it’s not the prettiest of dishes, but it’s still pretty damn tasty.

ENJOY IT. Let’s take a step back and relish in the fact that we made a delicious dinner with absolutely nothing in the refrigerator/pantry. We are Wonder People, we are. Go us. High five the dog or something.


* The amount of each ingredient really depends on the number of eggs you use. The more eggs, the more of each ingredient needs to be added. This frittata is not rocket science, y’all. 

** I boiled my potatoes to par-cook them. If you want to cook them in the pan the entire way, go for it, but we all know how long it takes potatoes to cook sometimes. While the sausage was browning, I just boiled the potatoes and by the time it was done, they were ready to brown up in the pan. 


This is How We Roll…Lasagna That Is…

In the middle of the week, I like to do something simple. Who doesn’t? And what’s simpler than going onto Pinterest and finding yourself a recipe? Not much, in my opinion. These recipes cater to college students and moms who, frankly, don’t have that much time on their hands, but yet they want to make a delicious and healthy meal for their family. Kudos to them.

Lasagna Rolls

Lasagna Rolls

I stumbled upon this recipe several months ago and I love it. It’s Lasagna Rolls. What’s not to love about it? You get lasagna in half the time. Not to mention it also bakes in half the time. Cha-ching, people. Cha-ching.

I’m not one to follow a recipe, though. It’s a waste of my culinary education (to the parentals…) if I don’t add a little something that makes it my own. So, how does Portobello Mushroom Lasagna Rolls sound? Delicious? I thought so…

Let’s get started!

THE INGREDIENTS.

  • Pancetta
  • Tomato Sauce (Recipe to follow)
  • Portobello Mushroom
  • Whole Milk Ricotta
  • Parmesan
  • Mozzarella
  • Egg
  • Salt and Pepper
  • Lasagna Noodles, par cooked

THE METHOD. Surprisingly, there are a couple of techniques to learn while making this dish as strange as that sounds. The two major components here are the sauce and the filling.

TIMG_2550HE SAUCE. I make a basic tomato sauce. There are 6 ingredients ( Well, main ingredients. I don’t count oil, salt, and pepper as ingredients…those are requirements to almost any dish). That’s it. It’s a sauce that lets the ingredients shine, which is what I love about it. And since there are only six ingredients, they need to be some of the best ingredients that you’ve ever eaten.


  • San Marzano Tomatoes, whole, canned
  • Yellow Onion, chopped
  • Garlic Cloves, minced
  • Red Pepper Flake
  • Fresh Thyme
  • Dried Bay Leaf
  • Olive Oil
  • Salt and Pepper, to taste

In a hot pot, add the olive oil and sauté the onion until translucent. Add your minced garlic and and red pepper flake. Cook this for a minute just to bring out the aromatics. Crush the whole tomatoes and add to the pot. Add whole thyme sprigs and bay leaf. Season to taste with salt and pepper. Leave it to cook over low heat for as long as possible. Tomato sauce is one of those things that the longer you let it cook, the better it will taste.

Some folks add sugar to their tomato sauce to combat the acidity of the tomatoes, but I really like it the way it is. I like it to have that bite. Also, I always make my tomato sauce with canned tomatoes because they are picked when ripe, steamed, and then canned. You can’t get a better tomato for a sauce than that. That’s just my opinion, though.

Now, I already had the sauce made from a previous Italian dish. So, I just pulled it out of the freezer and let it thaw out. To add a little something extra to this dish, I crisped up some pancetta and then poured the sauce over it to cook for a couple more hours. It gives it a unique saltiness and flavor.

IMG_2542THE FILLING. The other main component is, of course, the filling. It starts out as a basic ricotta filling and then you can add whatever flavors you want to it. I bought some baby portobello mushrooms at the grocery store earlier in the week and I know that they will work really well in this lasagna.

To prepare the mushrooms for the filling, chop them as fine as possible. I used a food processor for this because it makes life easier. You’re basically making a mushroom paste here. Add the paste to a dry pan over medium heat and cook down until all the moisture has evaporated. Believe it or not, mushrooms hold a lot of moisture and it is necessary to cook it all out so that the filling doesn’t become soggy. It will take about 15 to 20 minutes.

IMG_2548Put the cooked down paste into a medium-sized bowl and let it cool down. Once it is cool, add your ricotta, parmesan, and shredded mozzarella. Season to taste with salt and pepper. Stir until fully combined. This is where you need to make sure that your seasoning is on point. It actually should be a little over seasoned because once it is added to the pasta, the flavor will neutralize a bit.

At this point, it’s time to add the egg. The egg functions as a binder for the filling. It will make sure it holds together and doesn’t ooze out of your roll as you bake it in the oven. This is also why I suggested you already have your seasoning on point because people have issues with eating raw egg (unless it’s part of cookie dough/ cake batter it seems, but the egg really isn’t raw in those recipes, it is?)

IMG_2551THE ASSEMBLY.  Ah, the easy part. All you do is take par-cooked lasagna noodles and lay them out on a clean surface. Spread a thin layer of the filling all the way down the noodle. Roll it up and place in a lightly-greased baking dish. Cover with your sauce. Bake covered with aluminum foil for 20 minutes at 400 F.

IMG_2552ENJOY IT. Serve with bread and a green salad. Relish in the fact that you made a delectable lasagna without all the hassle of the traditional lasagna. I personally think it’s a perfectly respectable replacement. Simple doesn’t have to be bland and I think that this recipe shows that. It has big, powerful flavors. Perhaps even the Italians will be accepting?


Buttermilk Biscuits

Ya know, some recipes are just hard to master. You follow the recipe to a tee and it comes out of the oven looking like something your 5 year old would have made.

IMG_2516For me, that particular recipe is for biscuits. I’ve tried making them the way my mom did and nothing. I’ve followed other recipes. Zilch. Nada. Even the ones I made in my Introduction to Baking class at Johnson and Wales came out flat and dry. It was terrible. Me, a Southern woman, could not make a biscuit to save her life. What would my future kids say? Or even worse…what would my grandmother say? The woman who made biscuits every single day of her life while my mom was growing up. It would be an embarrassment to her to have a granddaughter who could’t make a fluffy and delicious, buttermilk biscuit.

There was only one thing I could do…”Do. Or do not. There is not try.”

There is no trying in biscuit making. Only doing. The biscuit would not get the best of me!

…and I am officially happy to say that it didn’t. I FINALLY mastered the proper technique (for my liking, anyways). After all, everything involving cooking revolves around technique…

IMG_2494THE INGREDIENTS. Short. Simple. To the point.

  • 2 cups AP flour, sifted
  • 5 tablespoons unsalted butter*, cut into small cubes, kept cold
  • 2 1/4 teaspoons baking powder
  • 1/2 teaspoon kosher salt
  • 3/4 cup buttermilk, kept cold

THE METHOD. The biscuit method. The pie crust method. Basically, the method to make things flaky, buttery, and delicious. It involves cutting the fat into the dry ingredients, adding the cold liquid, and mixing until the dough just comes together.

THE CUT. After all of the dry ingredients have been measured and sifted into a large bowl, we add the COLD butter. The butter should be cut into small cubes because this makes it faster to work them into the flour. You can use a cutting tool, but I usually just use my hands. The fat should be kept cold because this is what makes the biscuit flaky.

But, how?

After cutting in the butter, the flour should have a cornmeal-like texture

After cutting in the butter, the flour should have a cornmeal-like texture

The cold butter melts in the oven and creates a pocket of steam. These pockets create a flaky and delicate biscuit. If the butter is too warm when you cut it into the dough, you won’t get the flakiness, which would be sad.

Incorporate the butter as quickly as possible. The mixture should now resemble corn meal. After you are finished, put the bowl into the fridge just to make sure the butter remains cold. Leave it there 10 minutes before adding in the liquid ingredients.

THE MIX. Now that the butter has been chilled back down, it is time to add the COLD liquid. I’m using buttermilk because I love the tang that it gives to the biscuits. Cream is another good substitution due to its high fat content (Fun Fact: Fat makes baked goods tender…and more delicious, of course).

So, add your cold buttermilk (cold keeps the fat solid prior to baking) and mix until the dough just comes together. You don’t want to over mix biscuit dough because that will make for some tough and abnormally shaped biscuits.

FullSizeRenderTHE FOLD AND ROLL. Pour the contents of the bowl out onto a lightly floured surface. Gently fold it 3-4 times just so the dough completely comes together. Roll the dough into a rectangle about 1/2 inch thick. Fold it in thirds like you are folding a business letter. Roll it back out to 1/2 inch thick. Repeat the folding. Now, roll it out to 3/4 inches thick (the shape is up to you) and use a biscuit cutter (any size) to cut the biscuits. It’s important that you push straight down and DO NOT twist the cutter. Turning the cutter inhibits the formation of the layers.

The technique used here is similar to the technique used to make croissant dough and we all know how decadent and flaky croissants are, so it doesn’t hurt to borrow the technique for your biscuits.

IMG_2523-1

Slathered with sausage gravy…a recipe for another day!

THE BAKE. Place the biscuits about an inch apart on a lightly greased baking pan. Brush them with melted butter or buttermilk. I have also seasoned the tops of mine with a little bit of salt and black pepper. Bake them for about 15 minutes (or until lightly golden brown) at 400 F. I brush them with more melted butter once they are out of the oven because…well, why not? Butter makes everything better.

ENJOY THEM. Now, open one of these bad boys up and slather with more butter or some jam. Bite into the flaky tastiness that is a traditional and Southern buttermilk biscuit. They are to die for. Or you can slather them with some sausage gravy. It’s really up to you. All that matters is that you make you some biscuits because like butter, biscuits make everything better.

* You might notice that some recipes use shortening and others use part shortening and part butter. What gives? Well, shortening makes for a really flaky dough while butter adds some flakiness AND flavor. I wouldn’t make the biscuits just with shortening, but doing half-and-half would work out well. 

Pizza Dough and a Big Whoops

I love pizza. Pizza bagels, pizza quesadillas, pizza bread…you name a type of pizza and I probably love it. I’ve never met a person who doesn’t love this delectable dish and if I did, I probably wouldn’t trust them very much. I mean, who doesn’t like pizza?

IMG_2476Lately, I’ve been trying to perfect my own pizza. The toppings are the easy part. Can’t go wrong with whatever you put on it. The dough is where it gets tough. People spend years upon years trying to get their pizza dough just right. During my own time, I’ve learned that the taste and the texture of the dough all depends on the amount of time you let the dough ferment and rise. All over Pinterest there are recipes for “30 minute pizza dough” or “Quick and Easy Pizza.” Let me set everything straight right now: There is no such thing as “30 minute” or “Quick and Easy” pizza doughs. Well, at least no such thing as good pizza with such titles. Honestly, if you want to go that route, I’d suggest calling the local pizza place. It will taste better and not leave you feeling deflated.

Yesterday, I made yet another attempt at my pizza dough and frankly, it went quite well. The process of mixing it, that is.

Let’s turn back the clock…

THE INGREDIENTS.

  • 2 cups Bread Flour + some
  • 1 Packet Active Dry Yeast
  • Water (Honestly, don’t know the amount)
  • 1 Teaspoon Honey
  • 1 Tablespoon Olive Oil
  • Salt (to taste…I probably used 1/2 teaspoon)

IMG_2459THE METHOD. When you make doughs using yeast, you always start out with blooming/proofing the yeast, which basically activates the yeast and gets the process started more rapidly. Also, if your yeast doesn’t bloom, it’s a sign that it’s old and won’t work. So, it’s a nice check to have in place to make sure you will get a good rise out of your dough.

Simply, place a 1/2 cup of warm water (about 100 degrees F) in the bottom of the mixing bowl. Add the honey and stir (yeast feeds on sugar). Add the packet of yeast and stir. Allow it to sit for 10 minutes and you should have something that looks like the picture.

Now we will add the 2 cups of flour and then the salt on top of the flour. Salt kills yeast so we want to make sure the yeast stays active by incorporating the salt in last. Add your olive oil (optional) and turn your mixer on (or hand mix if you don’t have a mixer, bummer for you, though).

The dough has come up from the bottom of the bowl.

The dough has come up from the bottom of the bowl.

Let the mixer run for about 3 minutes. You may have to add more flour or water depending on the constancy. It’s all about the feel of the dough. It should feel tacky to the touch and should also come up off the sides of the bowl ( see picture).

Once the dough is at a good consistency, let the machine run for another 10 minutes on a medium setting. This will need the dough and form the gluten network so it will have a nice “chew” to it.

THE RISE. Place the ball of dough in an oiled bowl and allow to rise. For a “quick” dough, let it rise for two hours, but this won’t have much flavor or elasticity to it. The trick to pizza dough is to allow it to rise and ferment for as long as possible. A good rule of thumb is to make it the day before and allow it to rise for 8 hours on the counter then put it back in the fridge overnight. The yeast will continue to ferment even in the cold, which will give a nice flavor to the dough. Pull out the dough the next day and let it come to room temperature and rise a final time.

Most people don’t remember to make their dough in advance, which is fine. Just make the dough early in the day so it can get as much rise-time as possible.

Place in an oiled bowl to rise.

Place in an oiled bowl to rise.

THE WHOOPS. So, my dough was all ready to go. My mouth was watering just thinking about the delicious Cheese and Pesto pizza I was going to have. My kitchen was a little chilly and I’m super impatient. I wanted to help the yeast along (it likes to be warm) so I placed the bowl in the oven and turned it on to warm up slightly. Then I did the worst thing I could possibly do at that moment: I. Walked. Away. 

I know. I know. It was an amateur move. You see, I’m making dinner one night on a trip in a couple of weeks and I’m having trouble thinking of an idea, so I grabbed a cookbook (“A New Turn in the South” by Hugh Acheson if you must know) and started flipping through it…the libations, the starters, the poultry, the pork…

“OH NO!” I jumped up from the couch and ran into the kitchen to turn off the oven and pull the bowl of dough out. Shit…

The dough was still dough except the part that was directly touching the bowl, of course. The metal bowl was hot as hell. I was pretty sure I had deactivated the yeast and I would no longer get a rise out of my dough. What. A. Bummer. I couldn’t be completely positive, though. Not until  the time had passed and I made my pizza. I had a hunch. And it wasn’t a good one.

I’m also pretty positive I pulled my left ass muscle, though. I hadn’t moved that fast in awhile and now I have a slight limp. A reminder to get back to the gym…

My hunch was right. The dough did not turn out like I had expected. Lesson learned. Patience is a virtue. Especially when it comes to dough.

Even us trained folk mess up every once in awhile, but it won’t keep my from going back in that kitchen next week and trying my pizza dough out. Again. It shouldn’t keep you out either. People sometimes get defeated when it comes to cooking and they think they just can’t cook because it doesn’t naturally come to them. But you learn to cook. You learn what flavors go together. You learn the techniques and the methods. One day, you’ll wake up and realize that you can cook. And just maybe, you’ll be pretty damn good at it.


A Review

Unknown

1885 Southern Coastal Grill is a quaint little restaurant located in the heart of St. Elmo off of Broad Street, an area on the up-and-up. The “new” North Chattanooga, if you will (according to some people). We walked up to a patio full of people sipping cocktails with empty plates sitting in front of them enjoying the sounds of the bluegrass music coming from the live band that changes on a regular basis.

We’ve arrived early (purposefully and like always) and found a spot at the bar to sit and enjoy a drink while waiting for the rest of our party to walk through the door. For him, an Absolute and tonic. For me, a glass of the Tempranillo (a red wine from Spain), which didn’t make me swoon.

images

© Rootsrated.com

The inside was casual with a slightly rustic feel to it and a small number of tables; a few of which were full, but most everyone was outside enjoying the beautiful Fall weather.

Our party finally arrived and we were seated inside because the party at the table we called ahead for stayed to enjoy the music, but we were close enough to the patio to be able hear it anyways. Drinks were soon ordered, which took too long to arrive…I couldn’t tell if the bar or wait staff was at fault…

Our waiter explained the special of the evening…a farm-raised catfish pan-fried with creamed corn and red pepper relish. Even though it sounded good, no one at the table ordered it.

© Rootsrated.com

© Rootsrated.com

The rest of the menu was simple. Unoriginal, really. Shrimp and Grits…Steak Frites…Salmon with a lemon and herb compound butter…It also had a few grammatical and spelling errors (‘expect’ in place of “except” and grilled bread basmati rice, which I’m pretty sure doesn’t exist). Small errors to some, but to me it means a lack of detail. Detail is vital for the success of a restaurant…

We started with the Pimento Cheese and Fried Okra. The okra was perfectly fried and well seasoned. The pimento cheese had a brine-y aftertaste, which led me to believe the pimentos came from a jar. It’s just as simple to roast your own, in my opinion. The overall thought was that the starter was just okay.

When it came time to order our entrees, I went with the Shrimp and Grits. I’m a sucker for this particular dish—it must be the Southern girl in me. Other entrees ordered were the Shrimp and Crawfish Ètouffèe (spicy, but good), the Pork Chop (no complaints), the Steak Frites (cooked and seasoned well), the club sandwich (hard to mess up), and the Fried Flounder (enjoyed very much).

1885 Shrimp and Grits

1885 Shrimp and Grits

I was particularly confused by the lack of pork in my Shrimp and Grits. Traditionally, there is Andouille sausage or Tasso ham to give it a little bit of smokiness and a kick—it’s something I missed in their version. They say they have “Authentic Coastal Cuisine”, but I have a feeling the people of Charleston, South Carolina would disagree.

Other than that, the sauce was bright and well seasoned and the grits as creamy as they should be, but the shrimp were slightly overcooked. I could have done without the fried caper garnish.

All-and-all, the food was okay. There were no complaints, but no one was “wow-ed” either. This is something I’ve come to expect from Chattanooga restaurants, which is a shame.

A good atmosphere and great company made the experience memorable—the food didn’t take away from it, but it didn’t add to it, either. I would recommend that people try it, nonetheless. It’s a fun atmosphere in an up-and-coming part of town. So, Chattanoogans and visitors alike, go out and enjoy yourself. You only live once, after all.


A Rant

**DISCLAIMER** The following post is a rant and is not meant to offend anyone. It is for entertainment purposes only. 

So, you think since I love food and love cooking that I would probably enjoy going to the grocery store. I mean, it’s an entire room full of ingredients so what’s not to like? …Wrong. You actually couldn’t be more wrong. It’s the worst. The people. The lines. The ridiculous way they “organize” the aisles.

“Black beans are Mexican, right? Probably, in the Mexican ingredient section…”

“NO! Black beans are BEANS. They can be found in the canned BEAN section! The can in the Ethnic food aisle might say ‘Frijoles Negros’, but guess what? It’s the same thing as black beans. Shocking, I know.”

There is no need to segregate ingredients, people. They have feelings, too.

The golden one is Zoe and she's my baby. The spazzy one is Millie...why the picture of the dogs? Well, why not?

The golden one is Zoe and she’s my baby. The spazzy one is Millie…why the picture of the dogs? Well, why not?

And oh, the people… (granted, I’m not really a “people person”), but it’s like they forget the rules of common courtesy once stepping inside a grocery store. Some stop in the middle of the aisle and just stand there staring at the rows of ingredients. Your cart won’t move itself out of the way, lady. Ketchup is ketchup is ketchup, okay? It honestly doesn’t matter if you buy Hunt’s or Heinz. You see, they taste the exact same. Yes…yes, they do. (Some crazy people actually purchase their ketchup based on their political beliefs. For those of you who don’t know, Teresa Heinz is married to John Kerry…Yes, because you refused to purchase that $3 bottle of ketchup, you ruined their day.)

Have you ever gone to the store and every aisle you go down there is the exact same person coming the opposite way. And you continue along this path down Every. Single. Aisle. You now know more than you ever thought you’d know about a stranger based on their food choices…

“Oh, she bought organic granola…must be one of those people. Oreos, too? Huh…Interesting…”

Did I mention the lines? They have 15-plus checkout lines, but only ever have one or two open. What the hell’s the point of investing in the other thirteen lines? Would the front of the store look weird without all of this wasted equipment? Do the higher-ups enjoy seeing the look of frustration in the eyes of their customers? The reasonings are almost endless…

FullSizeRender-5

Adorable aren’t we…

I go to the grocery store because I love food and love cooking. Very difficult to find food anywhere else. Trust me, if I could get all my ingredients elsewhere, I would. It would save me from the frustration of walking through those sliding doors and ALWAYS picking the cart that has the bum wheel on it. (I’ve often thought that maybe all of the carts have a bum wheel, but when I’m walking around the store with my bum-wheeled cart, mine is the only one walking to the beat of its own drum…or wheel really…Anyone else have this problem?)

I know my rant is pointless. I know that on Sunday morning (possibly the worst time ever to go) I will wake up and go to the grocery store where I will incur the wrath of all of these things I’ve mentioned above. It simply wouldn’t be a trip to the grocery store without these issues arising, of course. Also doesn’t hurt that the beau absolutely loves going to the grocery store. Publix to be exact and specifically on Sunday mornings….No other store or time will do. The deli section, the free samples, and the brightly lit aisles call to him every weekend. I usually ignore these particular calls, but the things you do for the ones you love, amirite?

Oh! And one more thing…concerning those self-checkouts…the item is in the FREAKING bag!

The end.

Collard Greens and Liquid Gold

The South is full of wonderful foods. We have fried chicken, mac & cheese, cornbread, and IMG_2404-1biscuits. Each and every one of us has consumed these foods our entire lives and often look forward to the next time that we get to do so. But not all Southern foods are like this. Some foods are very divisive. You either love it or you absolutely hate it. Perhaps the most popular one in this group is collard greens. I know people who can’t stand to be in the same house that they are being cooked in because they hate the smell. Others you can’t keep away from the stove…they have to eat a spoonful every time they go through the kitchen. (Some people purposefully pass by the kitchen just to get a little taste).

Personally? I love collard greens. Just give me a big bowl and a biscuit to sop up the juices and I’m good to go. (Traditionally cornbread is served, but I’m not much for cornbread. I know, I’m not a true Southern woman…blah, blah, blah. But biscuits are Southern, too, so there!) The flavor is complex. It’s earthy, salty, sweet, and acidic. You just can’t beat it, in my opinion.

So, you’re lucky. Today, you get to learn how to master this Southern staple. We eat them year-round down here, but they are most popularly consumed on New Year’s Day to ensure wealth for the coming year. I make sure I prepare them a few more times than that because a little extra help in the wealth department here and there isn’t a bad thing.

Let’s get started, shall we?

Collard Green IngredientsTHE INGREDIENTS.

  • Fresh collard greens, cleaned and chopped (one stalk is what I’m using)
  • Corn oil
  • Thick-cut (or slab) bacon, small cubes
  • Onion, medium dice
  • Brown sugar
  • Sherry vinegar
  • Chicken stock
  • Salt and Pepper

THE METHOD. Okay. So maybe there isn’t a classic “method” to making collard greens, but there is a method, nonetheless. It’s a method that you can use to make all of your greens (collard, turnip, and mustard…). Basically, it involves cleaning the greens and then cooking the greens.

washing the greens2THE CLEAN. We begin by cleaning the collard greens. You can buy them already cleaned and bagged or still attached to the stalk, which his how I purchased them today.

Getting them off their stem is easy. Just grasp the stem near the bottom of the leaf and pull up. The leaves should just come right off.

Now, collards grow in sandy soil, so they need to be cleaned. I do this by filling my sink with cold water and placing the chopped greens right on in there. The greens will float and the sand will sink to the bottom. Simply remove the greens and place in a colander. They will be good to go.

The rendering bacon...mmm...

The rendering bacon…mmm…

THE COOK. Cooking these babies is so easy because it’s a one-pot wonder. Gotta love that.

  • Heat a large pot over medium heat. Add a little bit of corn oil to coat the bottom of the pan and throw in the bacon. Render all the fat out so that the collards can absorb all of the deliciousness.
  • Once the bacon is rendered, add the chopped onion. Cook this for a couple of minutes. I love the smell of bacon and onions cooking together. It’s absolutely divine and, in my opinion, tops the smell of onion and garlic. If I could put the smell onto the blog, I would. All of you would be racing to the store to purchase the ingredients to make these collards once you smelled this, I promise.
  • Add a little bit of brown sugar. I used about a tablespoon, but this is really up to you. Some people choose to leave out this ingredient, but I like the balance that it gives to the dish.
  • Add the sherry vinegar in equal parts with the sugar. The vinegar brightens the flavor of the greens.
  • Adding the GreensNow, it’s time to add the collard greens. Place as much as you can in the pot while still being able to stir.

You’re probably thinking, “Holy cow! That’s way too many greens, Kelley. And you still have several handfuls left to add!”….I know, I know. It seems like a lot, but greens cook down a ridiculous amount. There will be plenty of room.

Stir the greens around and once they have cooked down a bit, add some more. Continue this process until all of the greens are in the pot.

  • Add a cup or so of chicken stock to the pot. We’re braising the greens here so we don’t need to cover them with liquid.

Now, this liquid is what I refer to as “liquid gold.” Why? Because it’s the most complex part of the dish. It absorbs the saltiness and smokiness from the bacon as well as the sweetness from the onion and the brown sugar. The acidity from the vinegar and the bitter earthiness of the greens leach out into this liquid, too. It’s the perfect essence from the dish. You can even strain and use it as the base for soups or sauces. It’s what really makes these collard greens amazing.

Sorry for the rant…back to the greens…

  • Collard Green Close UpAdd a little bit of salt and pepper. You’ll probably add more of both at the end of the cooking process. Remember, you can always add more, but you can’t take it away once it’s already in there. Let the greens cook for an hour or so and re-check your seasoning.
  • Cover and cook for 3-4 hours on low, or until the greens are tender. A younger green won’t take as long to cook, but most of the greens in the grocery store are older and sturdier. Plus, the longer they cook, the more complex the flavors get and that’s a good thing.

ENJOY IT. Serve them up in a bowl with some biscuits (or cornbread) and you’ll have a delicious lunch. You can also serve them with some black-eyed peas or fried chicken. Honestly, you can’t go wrong with these collard greens.


Who’s a Snob?

© 2011 Just Shooting Memories

© 2011 Just Shooting Memories

I live in Chattanooga, Tennessee. It’s not big, but it’s not small, either. I guess you could call it medium-sized. It’s a city that is definitely on the up-and-up. I’m beginning to see it on “Top 10 Cities” to visit, to live, etc…There is also a lot more traffic around than when I grew up. It’s no Atlanta or New York, but the situation is still annoying, nonetheless.

Chattanooga is an outdoors-y city. Hiking, rock climbing, camping. You name an outdoor activity and the people who live here probably love it. It’s turning very “green”, as well. Everything is constantly changing. Other than the traffic, most of the changes are good.

What I’ve noticed the most is that the city is getting better food and better wine. But better in no way means excellent. Let’s just say we’re getting there. We’re on our way. One morning, I’ll wake up and realize that Chattanooga restaurants are on par with Atlanta, Charleston, or Nashville. At least I hope so. I really, really hope so. Because I miss good food. I miss good wine. I’m tired of being let down. I’m tired of always wanting more from the dishes, the chefs, the restaurants as a whole. Potential. That’s what Chattanooga has…Potential…

IMG_2345If you ask my sister (perhaps my entire family), I’m a snob. Food snob, wine snob, maybe even a life snob. Who knows. I never understood why, though. Why does wanting better food, better wine, better restaurant experiences make me a snob? I went to Culinary School. I worked at Five and Ten. I’ve eaten at some of the best restaurants in Athens, Charlotte, and Charleston. I’m trained. I know what good food is and I’m not ashamed to say when it’s not. What kind of chef and food-lover would I be if I accepted that undercooked snapper or oily calamari is as good as it gets? Because it’s not.

Food is no longer just nourishment. It is no longer something to shove down your throat to keep you going throughout the day. It’s an art. It’s something that should be appreciated and enjoyed. It has an uncanny ability to make everything better.

As I’ve said in previous posts, I love nothing more than going out to dinner with family and friends. The experience of dining out…the food, the wine, the atmosphere, the conversation…you just can’t beat it. It’s my absolute favorite thing to do. I love to be so absorbed in the experience and the stories that we stay until closing. The better the food and the better the wine that is served is what creates these moments. Who wants to stay and order coffee or a digestif after their entree completely bummed them out? No one. They want to go home. They regret the $150 they spent on the evening because it just wasn’t worth it.

© Boccaccia  Chattanooga, TN

© Boccaccia in Chattanooga, TN

Yup. You guessed it. I have no problem spending $200 on an evening out if my standards are met. It’s money well spent, in my opinion because it wasn’t just dinner. It wasn’t just food. It was a moment. A memory. I still remember eating at Good Food in Charlotte, NC with some friends from Culinary School. A wonderful memory was created that night, one that I can recall just as well as that lunch I had at Husk in Charleston, SC. A bottle of wine has the same domino effect, too. At Boccaccia, an Italian restaurant here in town, I remember the bottle of Sangiovese I ordered for my 23rd birthday, which allows me to remember who was there, what table I sat at, and the dish I ordered. You see, when I travel, I don’t remember the stores that I visited or the carriage tours I took. I remember everything based off of the food I ate, the wine I drank, and memories that I’ll never forget. It’s how I personally function. I won’t change. In fact, I don’t want to change.

So, call me a snob if you want. A food snob. A wine sob. A life snob. I’ll just have to take it as a compliment, I guess.


So, Do You Know the Banana Bread Man?

Yup, I’m going there. You can’t stop me even if you wanted to. Cover your eyes if you don’t want to read anymore about it…

Banana Bread

Banana Bread

Today, we are baking. I know. It’s unchartered waters for some. Baking can go terrible wrong. Haven’t you see some of those Pinterest fails? Are they hilarious…? Of course. But there is also a slight chance that those comical mistakes can happen to you. They happen to the best of us.

But there is no need to fear baking anymore because just like in cooking, there are techniques involved. If you follow the method, your cakes, biscuits, and breads should come out perfectly each time. It is a science, after all.

As with learning how to cook, we start with the simple recipes to teach us how to bake: Banana Bread. It’s the “How to Boil Water” of baking. Very difficult to mess up, I promise.

THE INGREDIENTS. I know I usually refrain from giving out measurements when I cook, but this isn’t cooking. This is the science of baking and you need proper measurements for any item to turn out correctly.

  • Banana Bread Ingredients1/2 cup of vegetable oil
  • 1 cup of sugar
  • 2 cups of AP flour
  • 2-3 ripe bananas (depends on how banana-y you want your bread)
  • 2 eggs
  • 1 tsp soda
  • 1/2 tsp salt
  • 1/2 tsp cinnamon
  • Chopped nuts (optional)

THE METHOD. No. We don’t just go down the list throwing everything in a bowl and hoping that it comes out of the oven looking and tasting okay. That’s just nonsense, people. It’s a simple method known as the Blending (or Muffin) Method. It’s called this because it’s the method used to make muffins, but it’s perfectly fine for making banana bread, too. It’s broken down into four parts. Four easy parts…

The Liquid Ingredients

The Liquid Ingredients

PART I. We start off by combining all of the liquid ingredients in a small bowl.

“Kelley, there isn’t any liquid in the recipe!” You might say in that frustrated tone of yours. Well, you are wrong. Because there are three ingredients that are considered liquids: the vegetable oil, the eggs, and the sugar. Yes, sugar is always considered a liquid because it acts more like  a liquid, than a solid. Scientifically, that is. Just trust me on this one.

Mix (by hand) all of the ingredients thoroughly. Set aside.

PART II. Now, we are going to combine all of the dry ingredients. This includes everything but the bananas. Measure them out properly and sift them into a larger bowl. Give it a quick mix to make sure it is all combined.

The addition of the baby food, I mean smashed bananas...

The addition of the baby food, I mean smashed bananas…

Fun Fact Time! Ever wonder why some recipes call for baking soda and others baking powder? Both are chemical leaveners. Both serve the same purpose. So what’s the difference? You see baking soda is simply that: soda. Soda alone won’t leaven anything. It is added to recipes that include some sort of acid (the bananas in this case) and moisture. Once these three elements combine with heat, they create carbon dioxide, which makes your baked good rise.

On the other hand, baking powder is a mixture of baking soda, acid (like cream of tartar), and corn starch. This is added to recipes that don’t have any other acid in them such as a basic cake recipe. It just requires moisture and it will act similarly to baking soda when heat is applied.

Now, back to the banana bread!

PART III. In another small bowl, mash the bananas with a fork. They’ll begin to break down and resemble baby food. It looks quite disgusting, in my opinion, but it’s required of us, nonetheless.

PART IV. This is the mixing part. Take your liquid ingredients and add them to the dry ingredients. Liquid to dry. Liquid to dry. It’s never the other way. Ever. It’ll be lumpy. Don’t do it.

It's ready to bake!

It’s ready to bake!

Once this has been done, fold the wet into the dry until just mixed. Over-mixing this type of baked good will result in tunneling (holes running through the bread) and peaking (you know when you bake muffins and they bake into a point instead of a dome? Yeah, it’s because you over-mixed). Also, it’ll create this thing called a gluten network that will make your bread tough instead of soft and tender. No one wants that.

Add the smashed bananas and fold until just mixed. This is also when you would add the chopped nuts. I don’t like nuts in my bread. I prefer most desserts nut-less…Pour into a lightly greased baking pan (I prefer a loaf pan for this) until the pan is 3/4 full. My particular pan was a perfect fit, but your’s may not be. Don’t worry. Make two if your pans are on the smaller side. If it’s on the larger side, you can still use it, but your loaf will be shorter. Bake at 350 F for 20-25 minutes. Remove and cover with aluminum foil. Bake another 20-25 minutes or until a toothpick comes out clean when you poke it. Why the foil? Because we don’t want the bread to brown too much.

banana bread slice-2ENJOY IT. Let the bread cool and then enjoy that sucker. You baked something! You deserve to enjoy it before anybody else has the opportunity to gobble it up before you. If it didn’t turn out quite like you wanted it to, don’t worry. It will with more practice. If baking was easy, everyone would do it. Plus, if you have a dog, they won’t know the difference between good and bad banana bread. Sometimes you just have to look on the bright side of things.

Now, go off and bake you some banana bread. Or blueberry muffins. Whatever floats your boat…